Hi,
I have been super busy as I am sure you all have been too. I will try to get a post up next week, but I am going to enjoy my Thanksgiving with my children, friends and family.
Have a great Thanksgiving!
Wednesday, November 27, 2013
Saturday, November 23, 2013
Holiday Online Card Workshop 2013-Last Class
Hi,
I was out of town yesterday and just now caught up on the lesson from yesterday. The lesson was wonderful as were all the others in the workshop. I really enjoyed this class and will take more if they are offered.
I didn't have all of the supplies that were needed to make Kristina Werner's or Jennifer McGuire's cards so I kinda did a version of Debby Hughes'. I put washi tape in Christmas colors in the backgound of Neena Desert Storm cardstock. I then cut a Christmas bulb from a Sizzix set that was in combination with Hero Arts stamps. These stamp/die sets are very nice and really great when you get them on sale! The sentiment stamp is from Hero Arts. I popped the Christmas bulb on foam squares and tied the top with some bakers twine. I also used a Wink of Stella clear glitter pen on the bulb. I love these pens they add just a subtle touch of sparkle that doesn't always show up in photographs, but it is a nice touch.
 I also did a second card, I used a Tim Holtz Blueprint Tree stamp. I stamped in on the Neena Desert Storm card stock and then I stamped a second one. I fussy cut and distressed the second tree with Tim Holtz Distress Ink and used foam squares to pop up the tree. I water colored the bulbs and attached them with foam squares. I also used the Wink of Stella clear glitter pen on this card. Shari Carroll did a version of this card and I admired it so much I wanted to try it.
 So glad you stopped by and have a great day!!
I was out of town yesterday and just now caught up on the lesson from yesterday. The lesson was wonderful as were all the others in the workshop. I really enjoyed this class and will take more if they are offered.
I didn't have all of the supplies that were needed to make Kristina Werner's or Jennifer McGuire's cards so I kinda did a version of Debby Hughes'. I put washi tape in Christmas colors in the backgound of Neena Desert Storm cardstock. I then cut a Christmas bulb from a Sizzix set that was in combination with Hero Arts stamps. These stamp/die sets are very nice and really great when you get them on sale! The sentiment stamp is from Hero Arts. I popped the Christmas bulb on foam squares and tied the top with some bakers twine. I also used a Wink of Stella clear glitter pen on the bulb. I love these pens they add just a subtle touch of sparkle that doesn't always show up in photographs, but it is a nice touch.


Wednesday, November 20, 2013
Holiday Online Card Workshop -Part 2- Masculine Card
Hello again!
The second post for today is the masculine card from the lesson in the online workshop today. I chose solid colors that seemed masculine to me. As I said in the first post today I do struggle not to add a lot of embellishments to cards that I intend to be sent to men or boys. The wreath is from Hero Arts, the same as the wreath stamp used on the feminine card. I embossed the wreath in silver and then just added the greeting which I embossed in white. The greeting has a couple of silver-ish brads to kind of tie it into the silver theme.
 Even though it is pretty simple and I spent way less time on it then the feminine card I am happy with it.
Thanks for stopping and happy crafting!!
The second post for today is the masculine card from the lesson in the online workshop today. I chose solid colors that seemed masculine to me. As I said in the first post today I do struggle not to add a lot of embellishments to cards that I intend to be sent to men or boys. The wreath is from Hero Arts, the same as the wreath stamp used on the feminine card. I embossed the wreath in silver and then just added the greeting which I embossed in white. The greeting has a couple of silver-ish brads to kind of tie it into the silver theme.

Thanks for stopping and happy crafting!!
Holiday Online Card Workshop - Day 5-Part 1-Feminine Card
Hello,
The lesson today focused on masculine and feminine cards. I have to say I struggle with this. I tend to make cards with lots of girly touches. I ask my husband for suggestions but he doesn't always get what I am asking. *sigh*. The first post will be the feminine card, I stenciled the background with a Simon Says Stamp stencil. The wreath stamp is Hero Arts and then I pieced with patterned papers that I chose from my scraps so can't really put a name to them, just Christmas colors. I embellished with some red, green and clear crystals and some green and red pearls. The greeting is embossed and popped up on foam squares. Hope you like!
 I am going to show the masculine card in a separate post. Thanks for looking.
The lesson today focused on masculine and feminine cards. I have to say I struggle with this. I tend to make cards with lots of girly touches. I ask my husband for suggestions but he doesn't always get what I am asking. *sigh*. The first post will be the feminine card, I stenciled the background with a Simon Says Stamp stencil. The wreath stamp is Hero Arts and then I pieced with patterned papers that I chose from my scraps so can't really put a name to them, just Christmas colors. I embellished with some red, green and clear crystals and some green and red pearls. The greeting is embossed and popped up on foam squares. Hope you like!

Monday, November 18, 2013
Holiday Online Card Workshop Day 4
Hi,
The online card class today was about finding ways to use the stamps you have in different ways. I made a card similar to what Shari Carroll made today. I used mostly Lawn Fawn products on this card. The silver embossed snowflakes along the curved lines is a Simon Says Stamp border die. I curved the border die on my stamp press to be able to stamp along the edge.
I cut the curved lines with the Simon Says Stamp A2 die. I absolutely love this die. The curves are edged with paper by cutting the curve and them moving it slightly and cutting again to get the edge.

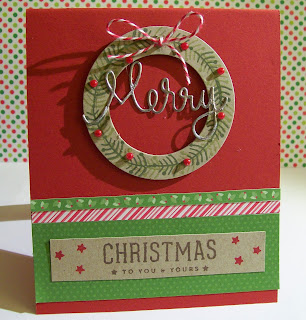 The wreath is made with the little fir branch (or whatever it is) in the Peace Joy Love Lawn Fawn stamp. I am pretty sure it isn't meant to be used to make a wreath, so that is where I used the stamp in a different way. :) I stamped in two shades of green and embellished with some red pearls. The Merry is part of a die from Simon Says Stamp that I embossed in silver. The papers are Lawn Fawn. I just added a small bow from bakers twine.
Thanks for stopping by and Happy Crafting!
The online card class today was about finding ways to use the stamps you have in different ways. I made a card similar to what Shari Carroll made today. I used mostly Lawn Fawn products on this card. The silver embossed snowflakes along the curved lines is a Simon Says Stamp border die. I curved the border die on my stamp press to be able to stamp along the edge.
I cut the curved lines with the Simon Says Stamp A2 die. I absolutely love this die. The curves are edged with paper by cutting the curve and them moving it slightly and cutting again to get the edge.

I added the small silver tree and I put some colored crystals on it so the tree would stand out. I like the way this card turned out.
I also made another card because it seems I am unable to stop once I start. I only stop because I have to cook dinner!

Thanks for stopping by and Happy Crafting!
Saturday, November 16, 2013
Thanksgiving Cards 2013
Hi,
Even though I have been taking the Holiday Online Card class which is focusing on Christmas cards, I realized I had better get busy making Thanksgiving cards for this year. I tried a couple of new things this year and liked how they came out.


 Happy Crafting!
Even though I have been taking the Holiday Online Card class which is focusing on Christmas cards, I realized I had better get busy making Thanksgiving cards for this year. I tried a couple of new things this year and liked how they came out.


Friday, November 15, 2013
Holiday Online Card Class Day 3
Hi,
Today was the third day of classes for the Holiday Card Workshop Online Classes. What stood out for me today was Jennifer Rzasa's quilling process for her card. I am going to practice and see if I can recreate it sometime in the future. What I created today was something like Shari Carroll's card. Her work is always so beautiful and she makes it look so easy.
I created this as 'homework' for today's class. I stamped a greeting and accented the stars with some gold Wink of Stella and then I framed it. The papers are from Lawn Fawn's Peace Joy Love collection. I added some pieced birds from the Lawn Fawn Peace Joy Love stamp set added them. The colors aren't totally traditional but I am happy with this card.

I also wanted to create a really simple card and I actually like this quite a bit. Just some stamping, a little coloring with Distress Markers, and some enamel dots. Pretty simple. Oh yeah this the Lawn Fawn Peace Joy Love stamp set.

Wednesday, November 13, 2013
Holiday Online Card Class-Day 2
Hello!
After watching today's videos for the Holiday Workshop I was stunned. Jennifer's 'puzzle piece' die cuts were phenomenal. Stephanie Klauk did suspension cards, which I decided to try and duplicate today. My card is below.
 This is the first time I have ever tried to do a suspension card. I 'floated' the snowflakes on fishing line (my husband's contribution). I embellished with sequins and the sentiment is anchored with twine and some red crystals to accent, I popped it up on some foam adhesives.
I decided I wanted to do some more die cutting since everything was already all over my craft table :) The card below is not a suspension card but has a lot of die cutting, which was also part of the class today. I cut the circle from a 3" Sizzix die and the border with the 3" and 4" circle die. The birds are from Lawn Fawn, so cute! I water colored the birds with Distress Markers and then die cut them. I embossed the snowflakes and the sentiment. I then used some bakers twine to tie it all up.

Thank you for stopping by and I hope you like the cards.
After watching today's videos for the Holiday Workshop I was stunned. Jennifer's 'puzzle piece' die cuts were phenomenal. Stephanie Klauk did suspension cards, which I decided to try and duplicate today. My card is below.

I decided I wanted to do some more die cutting since everything was already all over my craft table :) The card below is not a suspension card but has a lot of die cutting, which was also part of the class today. I cut the circle from a 3" Sizzix die and the border with the 3" and 4" circle die. The birds are from Lawn Fawn, so cute! I water colored the birds with Distress Markers and then die cut them. I embossed the snowflakes and the sentiment. I then used some bakers twine to tie it all up.

Thank you for stopping by and I hope you like the cards.
Monday, November 11, 2013
Holiday Card Workshop -Online Card Classes
I am participating in the Online Card Classes for the new Holiday Card Workshop 2013.
My first submission to the Student Gallery is below. It is only the first day and I have so many new ideas. The card below is 'homework' for the first day of classes.
 The background is the Falling Snow stencil from Simon Says Stamp using Colorbox Frost White ink. The stamp is from Hero Arts which I pieced with papers from Authentique Christmas collection. I embellished with enamel dots, Wink of Stella Clear Glitter pen, and gold stickles for the star. The sentiment is embossed and embellished with some sequins.
Inside of the card is below.
 Have a great day! Happy Crafting!
My first submission to the Student Gallery is below. It is only the first day and I have so many new ideas. The card below is 'homework' for the first day of classes.

Inside of the card is below.

Subscribe to:
Posts (Atom)